How to Create a WordPress Website
WordPress is a content management system (CMS). It is one of the world’s largest platforms of blogging. CMS is a great way to build many various types of websites.
Setting up a website with WordPress requires basic learning, but this guide is here to help you. This article can show you ways to start a blog or website and running perfectly.
Here is how to create a WordPress website on your own, step by step:
1. Buy a Domain Name
To start a website you need to buy a domain name that reflects your business or blog. It’s a good idea to make your domain name around either the name of your organization or a phrase that’s associated with the niche you’re in, but with some added words for better brandability.
A good domain name should be:
- Unique and brandable
- Easy to remember
- Keep Domain Name Short
- Easy to Pronounce and Spell
- Avoid Hyphens
- Avoid Double Letters
- Easy to type and difficult to mix up
- Including niche-related keywords
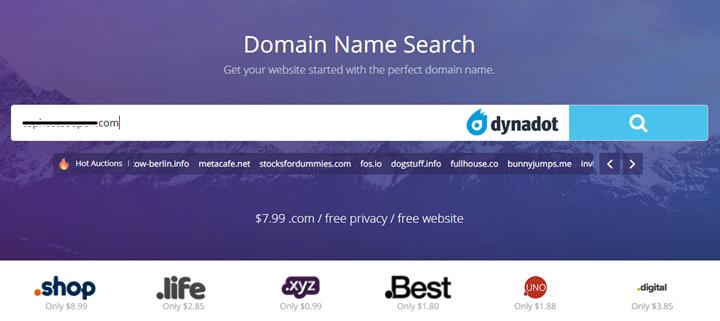
Buying a domain name is a simple process. You need to visit domain name registrar, a well-known one is https://www.dynadot.com/, then search for the domain name you want. While most domains will cost $6 to $14 per year.
In terms of the best domain name extension, .com is the most common and popular.
2. Sign Up to a Hosting
After buying a domain name it’s time to find a host for your website. Hosting is like a virtual plot of internet land. Without hosting you cannot able to get your website online.
If you want to buy a cheap hosting https://www.namecheap.com/ is best.
Whichever hosting provider you choose, you need to decide whether to opt for shared or managed WordPress hosting. With shared WordPress hosting, share a server and all its resources with other sites. You will share bandwidth and storage space. Shared hosting is cheaper and best suited to smaller sites. Namecheap’s shared hosting plans start at $1.44/month and Renews at $33.88/year.
Managed WordPress hosting take the form of VPS or dedicated hosting, better for larger sites that need more resources. It’s a bit costly. Namecheap’s managed WordPress plans start at $3.88/month.

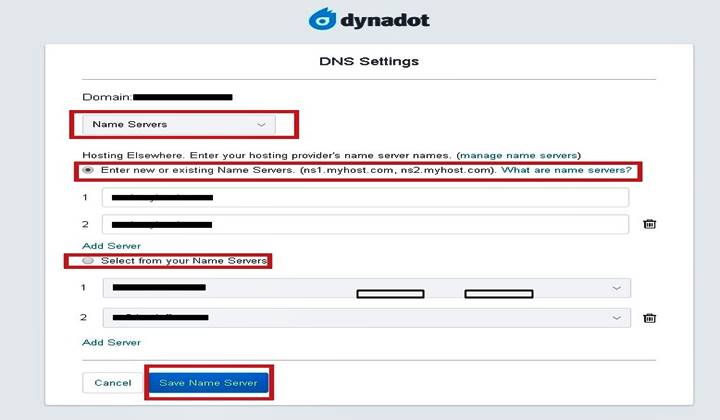
3. Activate domain name
When you place the domain registration order and make the payment, your domain will be registered in the domain registrar. After that, you would receive an address verification email at your registrant contact email address. You will need to approve it by clicking on the link provided in your email.
Log in to your domain cPanel
- Select the name of your domain.
- In the top left, click Menu.
- Under “Name servers,” you have to select custom name servers.
- In the “Name server” field, enter a custom name server.
- Click Add.
- Click Save.
- Set up new resource records with your DNS provider.
4. Adding domain to hosting
Once your hosting plan has been set up with a primary domain, you can set up addon domains.
How to add multiple domains to hosting plan:
- Log into your hosting cPanel.
- Then, click on Addon domains, under the domains section.
- Now, enter the domain in the New Domain Name section.
- Click Add Domain.

Way add DNS records to Addon domains:
- Go back to the Web Hosting Dashboard page in your account. Your Addon domains synced automatically, you need to refresh the page to show up.
- Select your Addon domain from the dropdown in the DNS Management section.
- Click the Confirm button to add the DNS records.
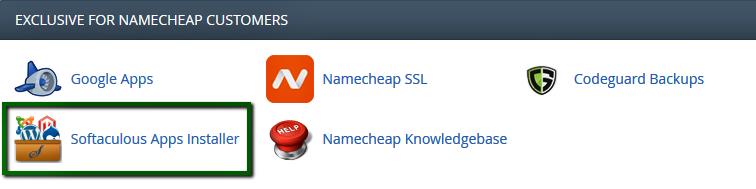
5. Install WordPress
Now you have to install WordPress. You can directly install this by One-click WordPress Installation.
One-click WordPress installation
Hosting providers offering one-click WordPress installation. Downloading WordPress is very easy in this way.
Namecheap offers one-click WordPress installs. Most hosting providers use standard ‘cPanel’ dashboard, the process should be fairly similar.
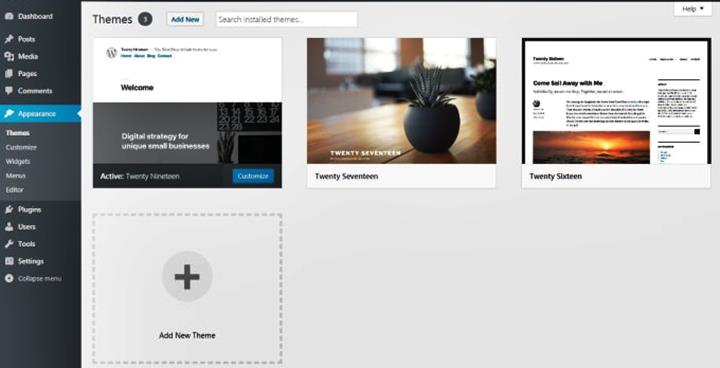
6. Choose a Theme
Now your site needs to start with a theme. A WordPress theme is like a ‘template’ for your website.
To install a free WordPress theme, follow these steps properly:
1. Log in to WordPress admin dashboard section.
2. Hover over ‘Appearance’, click ‘Themes’. This will take through to the theme dashboard.
3. Click the button above the themes that say ‘Add New’, then browse themes under ‘Featured’, ‘Popular’ etc, or use the search bar to search for specific themes related to your site.
4. Then click ‘Install’ under the theme to download it.
5. After a few minutes, a button will appear under the theme that says ‘Activate’. Click this, and the theme is activated for your site.
WordPress is regularly updating, and themes need to update accordingly. You need to install the update to make sure your site remains compatible with the new version of WordPress.
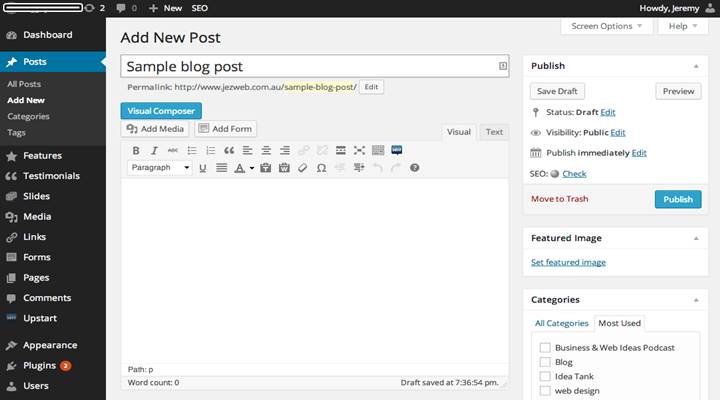
7. Add Content
After installing WordPress theme, you need to add content to your site.
Content on the site consists of two main categories:
1. Pages
Pages are static, need not change unless you edit them. The ‘About Us’ page is often a reflection of the purpose and personality of any site. Many themes show the different pages in a navigation bar along the top, or you can add the ‘Pages’ widget to list them down the side, too.
To add a new page for your WordPress site, go to Pages > Add New.
2. Posts
These are entries listed in sequential order, either on the homepage or in a ‘blog’ section. You can set posts as ‘sticky posts’ so they show at the top.
To add a new post for your WordPress site, go to Posts > Add New.
You can’t add posts to a specific page. If you want to group posts together, you need to set up a category.
Once you’ve ‘added’ a page or post, you need to enter it with your own content before clicking ‘publish’ to make it live on WordPress site. The best way is to add any written content sections in different ‘Text Blocks’. You can add images and videos in between posts. Videos can also be embedded from YouTube or similar video sharing sites, as well as image galleries either as a carousel of images or a selection of thumbnails.
Make sure you preview any draft posts or pages before publish to avoid mistakes.
3. Customize Your Site
After adding some pages and posts, your WordPress site starts to look like your own. Now, start customizing your site to the needs of your content.
There are some ways to customize your site, but keep focus on four things:
1. Change the Site Title and Tagline
When you set up your website, WordPress automatically sets title to ‘Just another WordPress site’. Now, you need to change this tittle.
- Log in to WordPress dashboard.
- Go to ‘Settings’, then ‘General’
- Add your website’s ‘title’ next to ‘Site Title’
- Next to ‘Tagline’, add a few keywords explaining what your site is about
- Click ‘Save Changes’
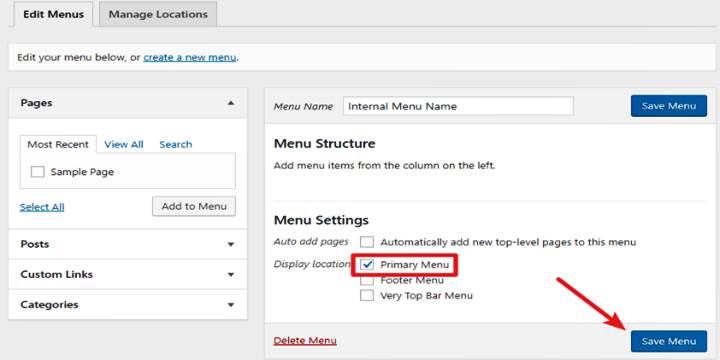
2. Add a navigation menu
This is the most important step in the making of any site.
Most themes have at least one menu option, while complex themes have several. Adding one is very simple:
1. Log in to your WordPress dashboard.
2. Hover over ‘Appearance’, then click ‘Menus’
3. Add a name for your menu next to ‘Menu Name’, then select which pages like to add from the list down the left side.
4. For themes with multiple menu options, you can see several tick box options under ‘Menu Settings’ such as ‘primary’, ‘secondary’ etc. You should tick primarily for now.
5. Click ‘Save Menu’ to put your new menu live.
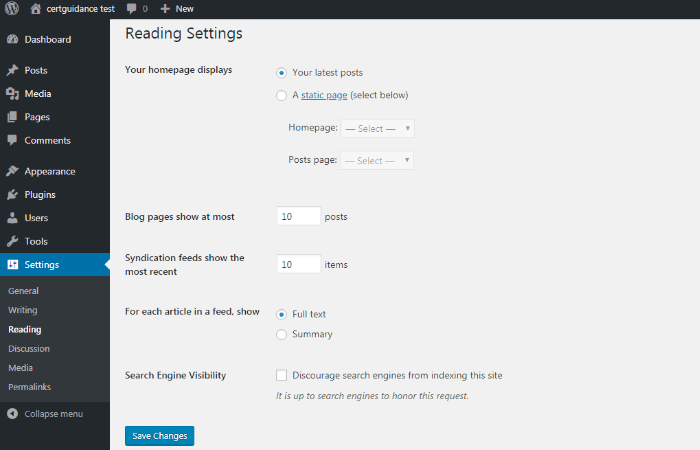
3. Set a homepage
Set a homepage to have two main options: a dynamic page, which updates with all your latest posts and updates regularly, or a static page, which keeps the same content.
1. Log in to the WordPress dashboard.
2. Click ‘Settings’, then go to ‘Reading’.
3. Go to ‘Reading Settings’, the first of which is ‘Front Page Displays’.
4. Select either ‘Your latest posts’ or ‘A static page’.
5. Click ‘Save Changes’ to make your homepage changes live.
If you select ‘Your latest posts’ option, you can also choose a number of recent blog posts that show up on the page , and just in case you want to show the full text or a summary of any post.
If you select ‘A static page’, you need to set up a page called ‘Blog’ which can carry all your latest posts.
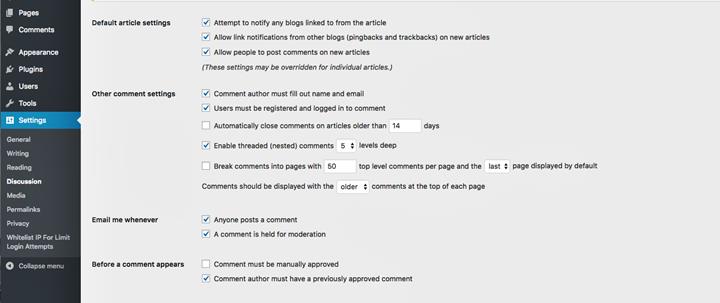
4. Change Comments Settings
WordPress comes with a built-in comment feature. Comments are a perfect way to show engagement and build community on site.
We strongly recommend that you add a filtering process so you don’t get immerse with spam:
- Log in to your WordPress dashboard.
- Click ‘Settings’, then go to ‘Discussion’.
- Now, select ‘Comment must be manually approved’. That way, you have the choice to publish or not to publish a comment.
- Don’t forget to click ‘Save Changes’.
5. Install Plugins
Installing plugins is a way of installing features that WordPress doesn’t include. All plugins featured in the WordPress plugin directory are free except premium plugins.
There are 55,000 plugins available to WordPress users; enough for every function, you could possibly need. And remember, having too many plugins will slow your site down. This will disturb your readers and ruin your performance in Google’s rankings.
Some important WordPress plugins for your site:
1. Contact Form by WP Forms
A simple but effective ‘drag and drop’ form builder plugin for adding customizable forms to your site.
2. Yoast SEO
A plugin to help optimize your content so that it ranks well on search engines.
3. AddToAny
A universal sharing platform that can be attached to a website by means of a plugin.
Visitors decide to share your content they can easily perform that on various popular sites like Facebook, Twitter, Pinterest, LinkedIn, and other social media.
4. UpdraftPlus
UpdraftPlus is the most popular WordPress backup plugin. It allows you to set up automatic backups and safely store them on a remote location like Google Drive and Dropbox.
It makes it easy to restore your website from a backup. Their basic plugin is free, but have a paid plan with extra features and priority.
You can upload a plugin to the WordPress library. All plugins come with a user-generated star rating and reviews. We recommend for plugins with a few hundred downloads with positive reviews.
Here’s a selection of the SEO plugins through WordPress.
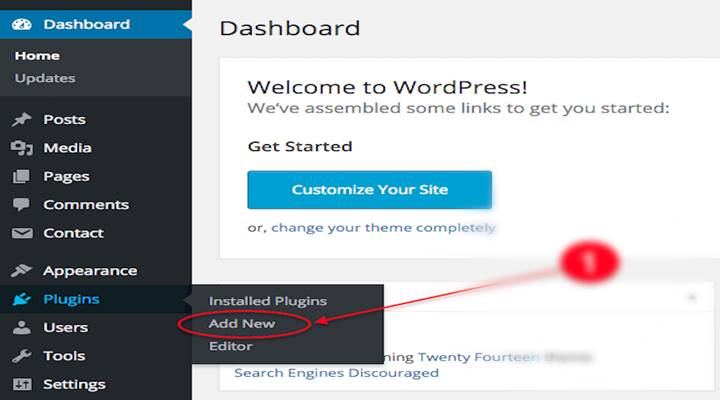
Here’s how you add a plugin to your WordPress site properly:
1. Log in to your WordPress dashboard.
2. Go to ‘Plugins’, then ‘Add New’.
3. Use the search bar in the top right-hand side to search for specific plugins you’re looking for.
4. Once you’ve found the one you like, look at its reviews and ratings.
5. Click the ‘Install Now’ button.
6. WordPress has finished downloading the plugin, you get a completion message and click ‘Activate Plugin’.
7. Next, go to settings to configure your plugin.
Always keep an eye out for WordPress plugin updates, and install them properly.
WordPress is an excellent content management system (CMS) that has allowed many organizations to design their own website or personal blog. It has become the most reliable and trusted platform for many business entities.
WordPress is not only ranked its place in blogging platforms, but there has been also a notable rise in the usage of WordPress for the creation of websites for businesses or personal blogs.
Writer: Tahsin Ahmed
Great Post. Helps me a lot to create a WordPress Site
very helpful post for beginner